> ## Documentation Index
> Fetch the complete documentation index at: https://wb-21fd5541-dependabot-github-actions-actions-cache-6.mintlify.site/llms.txt
> Use this file to discover all available pages before exploring further.
> Follow this getting started tutorial for W&B Launch covering jobs, queues, agents, and running ML workloads.
# Tutorial: W&B Launch basics
## What is Launch
This tutorial introduces ML practitioners and platform teams to W\&B Launch, and walks you through creating a launch job, setting up a queue, connecting an agent, and submitting jobs to run. By the end, you've run a containerized ML workload through W\&B Launch and have a working queue and agent that your team can reuse.
Scale training [runs](/models/runs/) from your desktop to a compute resource like Amazon SageMaker, Kubernetes, and more with W\&B Launch. After you configure Launch, you can run training scripts, model evaluation suites, prepare models for production inference, and more with a few clicks and commands.
## How it works
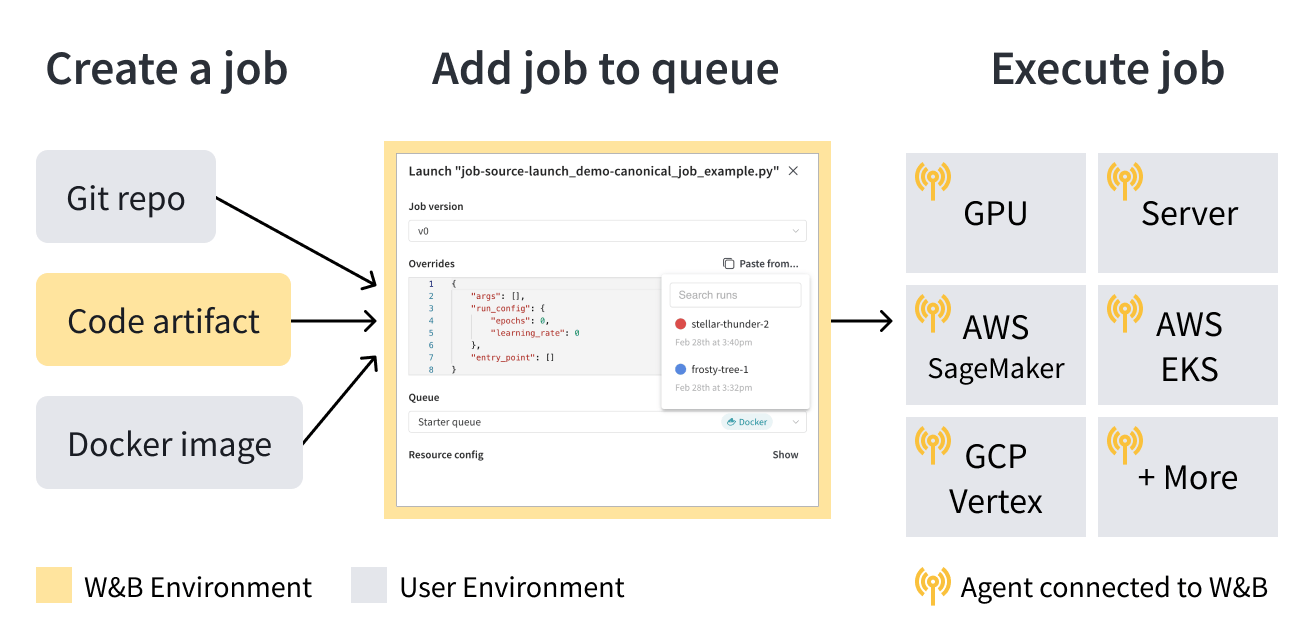
Launch is composed of three fundamental components: **launch jobs**, **queues**, and **agents**.
A [*launch job*](./launch-terminology#launch-job) is a blueprint for configuring and running tasks in your ML workflow. Once you have a launch job, you can add it to a [*launch queue*](./launch-terminology#launch-queue). A launch queue is a first-in, first-out (FIFO) queue where you can configure and submit your jobs to a particular compute target resource, such as Amazon SageMaker or a Kubernetes cluster.
As jobs are added to the queue, [*launch agents*](./launch-terminology#launch-agent) poll that queue and run the job on the system targeted by the queue.
 Based on your use case, you (or someone on your team) configure the launch queue according to your chosen [compute resource target](./launch-terminology#target-resources) (for example, Amazon SageMaker) and deploy a launch agent on your own infrastructure.
See the [Terms and concepts](./launch-terminology) page for more information about Launch.
## Get started
Depending on your use case, explore the following resources to get started with W\&B Launch:
* If this is your first time using W\&B Launch, start with the [Launch walkthrough](#walkthrough) guide.
* Learn how to set up [W\&B Launch](/platform/launch/set-up-launch/).
* Create a [launch job](/platform/launch/launch-terminology/#launch-job).
* Check out the W\&B Launch [public jobs GitHub repository](https://github.com/wandb/launch-jobs) for templates of common tasks like [deploying to Triton](https://github.com/wandb/launch-jobs/tree/main/jobs/deploy_to_nvidia_triton), [evaluating an LLM](https://github.com/wandb/launch-jobs/tree/main/jobs/openai_evals), or more.
* View launch jobs created from this repository in this public [`wandb/jobs` project](https://wandb.ai/wandb/jobs/jobs) W\&B project.
## Walkthrough
This page walks through the basics of the W\&B Launch workflow.
W\&B Launch runs machine learning workloads in containers. Familiarity with containers isn't required but may be helpful for this walkthrough. See the [Docker documentation](https://docs.docker.com/guides/docker-concepts/the-basics/what-is-a-container/) for a primer on containers.
## Prerequisites
Before you get started, ensure you have satisfied the following prerequisites. These cover the account, tooling, and authentication you need to run the commands later in this walkthrough.
1. Sign up for an account at [https://wandb.ai/site](https://wandb.ai/site) and then log in to your W\&B account.
2. This walkthrough requires terminal access to a machine with a working Docker CLI and engine. See the [Docker installation guide](https://docs.docker.com/engine/install/) for more information.
3. Install W\&B Python SDK version `0.17.1` or higher:
```bash theme={null}
pip install wandb>=0.17.1
```
4. In your terminal, run `wandb login` or set the `WANDB_API_KEY` environment variable to authenticate with W\&B.
In your terminal, run:
```bash theme={null}
wandb login
```
```bash theme={null}
WANDB_API_KEY=[API-KEY]
```
Replace `[API-KEY]` with your W\&B API key.
## Create a launch job
A launch job is the blueprint for the workload you want Launch to run, so you need one before you can submit work to a queue. Create a [launch job](./launch-terminology#launch-job) in one of three ways: with a Docker image, from a git repository, or from local source code:
To run a pre-made container that logs a message to W\&B, open a terminal and run the following command:
```bash theme={null}
wandb launch --docker-image wandb/job_hello_world:main --project launch-quickstart
```
The preceding command downloads and runs the container image `wandb/job_hello_world:main`.
Launch configures the container to report everything logged with `wandb` to the `launch-quickstart` project. The container logs a message to W\&B and displays a link to the run in W\&B. Click the link to view the run in the W\&B UI.
To launch the same hello-world job from its [source code in the W\&B Launch jobs repository](https://github.com/wandb/launch-jobs), run the following command:
```bash theme={null}
wandb launch --uri https://github.com/wandb/launch-jobs.git \\
--job-name hello-world-git --project launch-quickstart \\
--build-context jobs/hello_world --dockerfile Dockerfile.wandb \\
--entry-point "python job.py"
```
The command does the following:
1. Clones the [W\&B Launch jobs repository](https://github.com/wandb/launch-jobs) to a temporary directory.
2. Creates a job named **hello-world-git** in the **hello** project. This job tracks the exact source code and configuration used to run the code.
3. Builds a container image from the `jobs/hello_world` directory and the `Dockerfile.wandb`.
4. Starts the container and runs the `job.py` python script.
The console output shows the image build and run. The output of the container should be nearly identical to the previous example.
You can launch code that isn't versioned in a git repository by specifying a local directory path to the `--uri` argument.
Create an empty directory and add a Python script named `train.py` with the following content:
```python theme={null}
import wandb
with wandb.init() as run:
run.log({"hello": "world"})
```
Add a file `requirements.txt` with the following content:
```text theme={null}
wandb>=0.17.1
```
From within the directory, run the following command:
```bash theme={null}
wandb launch --uri . --job-name hello-world-code --project launch-quickstart --entry-point "python train.py"
```
The command does the following:
1. Logs the contents of the current directory to W\&B as a Code Artifact.
2. Creates a job named **hello-world-code** in the **launch-quickstart** project.
3. Builds a container image by copying `train.py` and `requirements.txt` into a base image and `pip install` the requirements.
4. Starts the container and runs `python train.py`.
## Create a queue
With a launch job in place, the next step is to create a queue that defines where and how jobs run. Launch is designed to help teams build workflows around shared compute. In the examples so far, the `wandb launch` command has run a container synchronously on the local machine. Launch queues and agents enable asynchronous runs of jobs on shared resources and advanced features like prioritization and hyperparameter optimization. To create a basic queue, follow these steps:
1. Navigate to [wandb.ai/launch](https://wandb.ai/launch) and click the **Create a queue** button.
2. Select an **Entity** to associate the queue with.
3. Enter a **Queue name**.
4. Select **Docker** as the **Resource**.
5. Leave **Configuration** blank.
6. Click **Create queue**.
After you click the button, the browser redirects to the **Agents** tab of the queue view. The queue remains in the **Not active** state until an agent starts polling.
Based on your use case, you (or someone on your team) configure the launch queue according to your chosen [compute resource target](./launch-terminology#target-resources) (for example, Amazon SageMaker) and deploy a launch agent on your own infrastructure.
See the [Terms and concepts](./launch-terminology) page for more information about Launch.
## Get started
Depending on your use case, explore the following resources to get started with W\&B Launch:
* If this is your first time using W\&B Launch, start with the [Launch walkthrough](#walkthrough) guide.
* Learn how to set up [W\&B Launch](/platform/launch/set-up-launch/).
* Create a [launch job](/platform/launch/launch-terminology/#launch-job).
* Check out the W\&B Launch [public jobs GitHub repository](https://github.com/wandb/launch-jobs) for templates of common tasks like [deploying to Triton](https://github.com/wandb/launch-jobs/tree/main/jobs/deploy_to_nvidia_triton), [evaluating an LLM](https://github.com/wandb/launch-jobs/tree/main/jobs/openai_evals), or more.
* View launch jobs created from this repository in this public [`wandb/jobs` project](https://wandb.ai/wandb/jobs/jobs) W\&B project.
## Walkthrough
This page walks through the basics of the W\&B Launch workflow.
W\&B Launch runs machine learning workloads in containers. Familiarity with containers isn't required but may be helpful for this walkthrough. See the [Docker documentation](https://docs.docker.com/guides/docker-concepts/the-basics/what-is-a-container/) for a primer on containers.
## Prerequisites
Before you get started, ensure you have satisfied the following prerequisites. These cover the account, tooling, and authentication you need to run the commands later in this walkthrough.
1. Sign up for an account at [https://wandb.ai/site](https://wandb.ai/site) and then log in to your W\&B account.
2. This walkthrough requires terminal access to a machine with a working Docker CLI and engine. See the [Docker installation guide](https://docs.docker.com/engine/install/) for more information.
3. Install W\&B Python SDK version `0.17.1` or higher:
```bash theme={null}
pip install wandb>=0.17.1
```
4. In your terminal, run `wandb login` or set the `WANDB_API_KEY` environment variable to authenticate with W\&B.
In your terminal, run:
```bash theme={null}
wandb login
```
```bash theme={null}
WANDB_API_KEY=[API-KEY]
```
Replace `[API-KEY]` with your W\&B API key.
## Create a launch job
A launch job is the blueprint for the workload you want Launch to run, so you need one before you can submit work to a queue. Create a [launch job](./launch-terminology#launch-job) in one of three ways: with a Docker image, from a git repository, or from local source code:
To run a pre-made container that logs a message to W\&B, open a terminal and run the following command:
```bash theme={null}
wandb launch --docker-image wandb/job_hello_world:main --project launch-quickstart
```
The preceding command downloads and runs the container image `wandb/job_hello_world:main`.
Launch configures the container to report everything logged with `wandb` to the `launch-quickstart` project. The container logs a message to W\&B and displays a link to the run in W\&B. Click the link to view the run in the W\&B UI.
To launch the same hello-world job from its [source code in the W\&B Launch jobs repository](https://github.com/wandb/launch-jobs), run the following command:
```bash theme={null}
wandb launch --uri https://github.com/wandb/launch-jobs.git \\
--job-name hello-world-git --project launch-quickstart \\
--build-context jobs/hello_world --dockerfile Dockerfile.wandb \\
--entry-point "python job.py"
```
The command does the following:
1. Clones the [W\&B Launch jobs repository](https://github.com/wandb/launch-jobs) to a temporary directory.
2. Creates a job named **hello-world-git** in the **hello** project. This job tracks the exact source code and configuration used to run the code.
3. Builds a container image from the `jobs/hello_world` directory and the `Dockerfile.wandb`.
4. Starts the container and runs the `job.py` python script.
The console output shows the image build and run. The output of the container should be nearly identical to the previous example.
You can launch code that isn't versioned in a git repository by specifying a local directory path to the `--uri` argument.
Create an empty directory and add a Python script named `train.py` with the following content:
```python theme={null}
import wandb
with wandb.init() as run:
run.log({"hello": "world"})
```
Add a file `requirements.txt` with the following content:
```text theme={null}
wandb>=0.17.1
```
From within the directory, run the following command:
```bash theme={null}
wandb launch --uri . --job-name hello-world-code --project launch-quickstart --entry-point "python train.py"
```
The command does the following:
1. Logs the contents of the current directory to W\&B as a Code Artifact.
2. Creates a job named **hello-world-code** in the **launch-quickstart** project.
3. Builds a container image by copying `train.py` and `requirements.txt` into a base image and `pip install` the requirements.
4. Starts the container and runs `python train.py`.
## Create a queue
With a launch job in place, the next step is to create a queue that defines where and how jobs run. Launch is designed to help teams build workflows around shared compute. In the examples so far, the `wandb launch` command has run a container synchronously on the local machine. Launch queues and agents enable asynchronous runs of jobs on shared resources and advanced features like prioritization and hyperparameter optimization. To create a basic queue, follow these steps:
1. Navigate to [wandb.ai/launch](https://wandb.ai/launch) and click the **Create a queue** button.
2. Select an **Entity** to associate the queue with.
3. Enter a **Queue name**.
4. Select **Docker** as the **Resource**.
5. Leave **Configuration** blank.
6. Click **Create queue**.
After you click the button, the browser redirects to the **Agents** tab of the queue view. The queue remains in the **Not active** state until an agent starts polling.
 For advanced queue configuration options, see the [advanced queue setup page](/platform/launch/setup-queue-advanced/).
## Connect an agent to the queue
A queue stays idle until an agent polls it, so you must connect an agent before any jobs can run. The queue view displays an **Add an agent** button in a red banner at the top of the screen if the queue has no polling agents. Click the button to view and copy the command to run an agent. The command should look like the following:
```bash theme={null}
wandb launch-agent --queue [QUEUE-NAME] --entity [ENTITY-NAME]
```
Replace `[QUEUE-NAME]` with the name of your queue and `[ENTITY-NAME]` with your W\&B entity. Run the command in a terminal to start the agent. The agent polls the specified queue for jobs to run. After it receives a job, the agent downloads or builds and then runs a container image for the job, as if you had run the `wandb launch` command locally.
Navigate back to [the Launch page](https://wandb.ai/launch) and verify that the queue now shows as **Active**.
## Submit a job to the queue
With a queue and a polling agent in place, you can now submit one of the launch jobs you created earlier and watch it run on the shared compute. Navigate to your **launch-quickstart** project in your W\&B account and open the jobs tab from the navigation on the left side of the screen.
The **Jobs** page displays a list of jobs created from previous runs. Click your launch job to view source code, dependencies, and any runs created from the job. After you complete this walkthrough, the list contains three jobs.
Pick one of the jobs and follow these instructions to submit it to the queue:
1. Click the **Launch** button to submit the job to a queue. The **Launch** drawer appears.
2. Select the **Queue** you created earlier and click **Launch**.
This submits the job to the queue. The agent polling this queue picks up and runs the job. You can monitor the progress of the job from the W\&B UI or by inspecting the output of the agent in the terminal.
The `wandb launch` command can push jobs to the queue directly by specifying the `--queue` argument. For example, to submit the hello-world container job to the queue, run the following command:
```bash theme={null}
wandb launch --docker-image wandb/job_hello_world:main --project launch-quickstart --queue [QUEUE-NAME]
```
Replace `[QUEUE-NAME]` with the name of your queue.
You now have a complete W\&B Launch workflow in place: a launch job, a queue, a polling agent, and a job running asynchronously on shared compute. You can reuse this pattern for your own training, evaluation, and inference workloads.
For advanced queue configuration options, see the [advanced queue setup page](/platform/launch/setup-queue-advanced/).
## Connect an agent to the queue
A queue stays idle until an agent polls it, so you must connect an agent before any jobs can run. The queue view displays an **Add an agent** button in a red banner at the top of the screen if the queue has no polling agents. Click the button to view and copy the command to run an agent. The command should look like the following:
```bash theme={null}
wandb launch-agent --queue [QUEUE-NAME] --entity [ENTITY-NAME]
```
Replace `[QUEUE-NAME]` with the name of your queue and `[ENTITY-NAME]` with your W\&B entity. Run the command in a terminal to start the agent. The agent polls the specified queue for jobs to run. After it receives a job, the agent downloads or builds and then runs a container image for the job, as if you had run the `wandb launch` command locally.
Navigate back to [the Launch page](https://wandb.ai/launch) and verify that the queue now shows as **Active**.
## Submit a job to the queue
With a queue and a polling agent in place, you can now submit one of the launch jobs you created earlier and watch it run on the shared compute. Navigate to your **launch-quickstart** project in your W\&B account and open the jobs tab from the navigation on the left side of the screen.
The **Jobs** page displays a list of jobs created from previous runs. Click your launch job to view source code, dependencies, and any runs created from the job. After you complete this walkthrough, the list contains three jobs.
Pick one of the jobs and follow these instructions to submit it to the queue:
1. Click the **Launch** button to submit the job to a queue. The **Launch** drawer appears.
2. Select the **Queue** you created earlier and click **Launch**.
This submits the job to the queue. The agent polling this queue picks up and runs the job. You can monitor the progress of the job from the W\&B UI or by inspecting the output of the agent in the terminal.
The `wandb launch` command can push jobs to the queue directly by specifying the `--queue` argument. For example, to submit the hello-world container job to the queue, run the following command:
```bash theme={null}
wandb launch --docker-image wandb/job_hello_world:main --project launch-quickstart --queue [QUEUE-NAME]
```
Replace `[QUEUE-NAME]` with the name of your queue.
You now have a complete W\&B Launch workflow in place: a launch job, a queue, a polling agent, and a job running asynchronously on shared compute. You can reuse this pattern for your own training, evaluation, and inference workloads.